
these little 'have a heart' strings are easily made from a few items laying around the nest, they are the perfect antidote to the winter blues and best of all, do not scream "i am a valentines decoration" therefore can stay up for way longer than a few weeks in Feb!
but i must warn you before we begin, they are tres addictive, i made one a few days after Our #1 left on the 28th Dec, that little string did a peachy job of distracting my heavy heart, so i made another and another, before i knew it i had a whole chorus of them hanging in my studio looking mighty pretty.
ingredients:
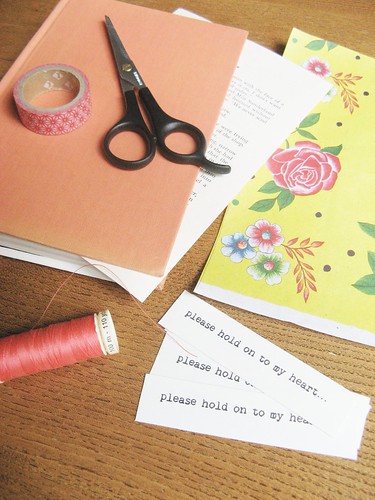
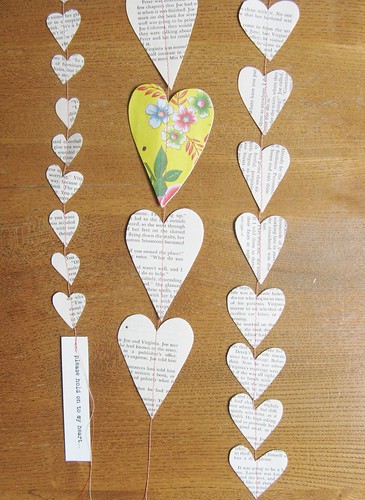
* an old book, not a first addition that belongs to someone else in your nest and worth a bob or two, one that perhaps you picked up at the thrift store a while back. old books have paper which feels nice in the hands and the writing has a lovely 'tippity tapped' look about it
* a small pair of paper scissors
* sewing thread in a pretty color for your trusty sewing machine
* a small piece of left over wrapping paper or wallpaper, something bright and cheery
* some pretty tape, i used that lovely colorful Japanese tape we see everywhere but failing that, good old clear tape will do the job, just something to stick the strings up with
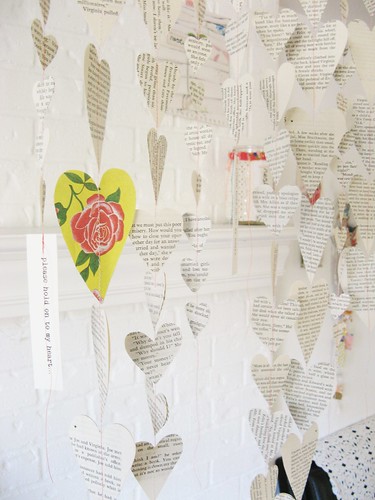
* a little saying either printed, typed or handwritten on some card, just a few though, not every string has one. i used 'please hold on to my heart' but i am thinking there are many other little sayings worthy of this 'how-to'
before we begin, a couple of things to note:
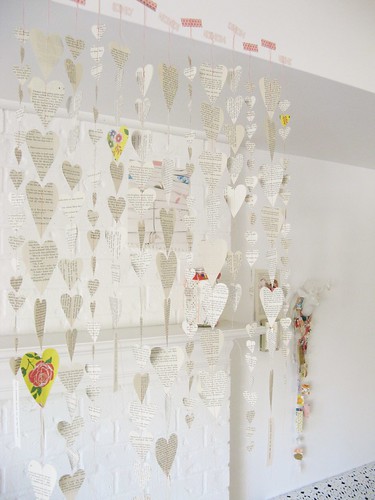
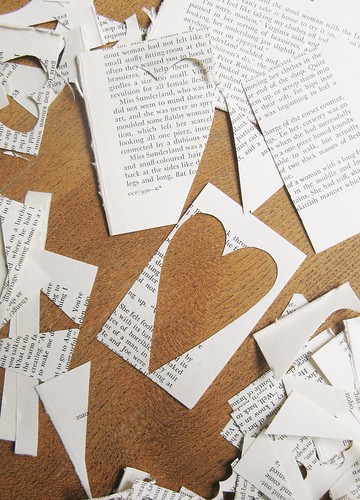
* the hearts are cut from two pages put together, so they have a little more sturdiness to them
* saying that, these sweeties are delicate, the strings will break easily if small hands get to them, or paws for that matter, so do hang them where they may be admired without worry
* i made my strings different lengths to add to the eclectic look, the longest being 42"/107cm and the shortest being 20"/51cm
recipe:
1. take your double thickness book page and start cutting out heart shapes, do not draw them first, just cut away not worrying about them being perfectly heart shaped. i cut hearts in three different sizes, itty bitty, medium and largish. i worked on largish first till i got the swing of cutting hearts free hand and then moved to the smaller ones.
keep them in separate sized piles if you wish for your strings to look like mine.
2. cut a few itty bitty, medium and largish, double sided hearts out of your colorful patterned paper, just one or two, unless you prefer a more colorful look, which actually would look rather splendid and if so, then cut away!
3. take your little hearts carefully over to your trusty sewing machine, making sure you have plenty of spare thread at the top for hanging the string, begin feeding your little paper hearts through the machine until you have a nice length of hearts. finish off your first string by leaving a lovely long thread as tails. continue this process with the rest of your paper hearts, being sure to occasionally pop in a colored heart amongst the book page hearts and on the bottom of some, before you finish, attach your little printed or handwritten note.
4. when each string is done, tape them up as you go, therefore avoiding getting into a tangle and also keeping them safe. this is the bit that causes addiction, once a couple are hanging up you begin to see how lovely a few paper hearts can look and the need to make more consumes you.
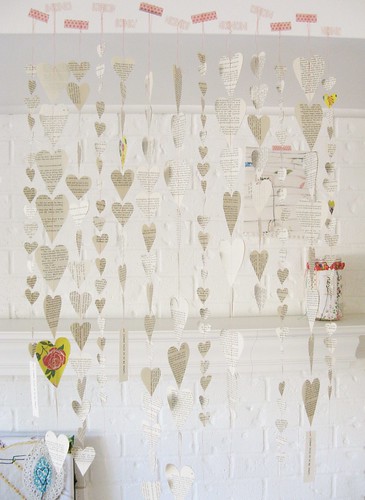
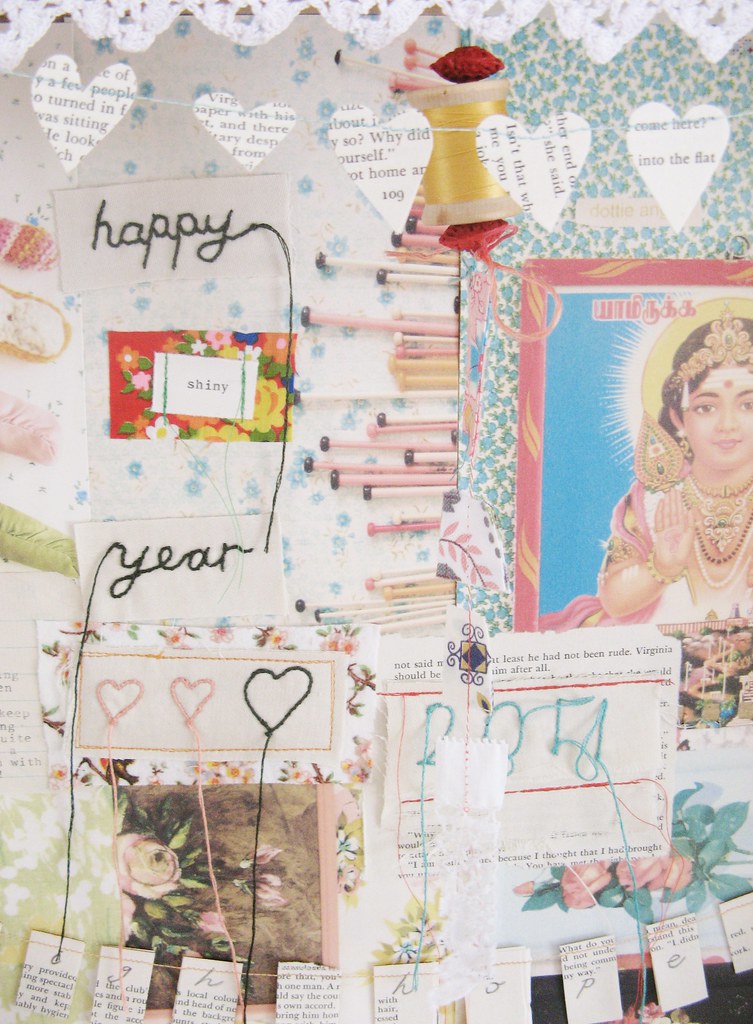
and that is it! if you wished, you could fold out your paper hearts as they are double sided but i kept mine flat, you could also stitch them across the top to make them 'garland' style, like in my 'shiny new year' diorama... thinking they would make lovely little gifts, i made one extra long one and mailed it to Our #1 so she may hang it in her little nest and think of us, whilst we think of her
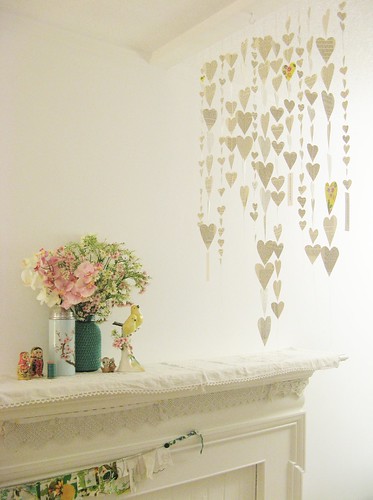
i have now moved our 'have a heart' strings to the lounge and last night as i was pottling around the place finishing up for the day i noted how peachy they looked with the light shining from behind, their little hearty silhouettes doing a grand job at warming up the winter blues
she is running low on gold sticky stars because of your fabby 'i spy' and recall skills ~ Tif
My favorite, the yellow one, is only my favorite because it is in a shower of all the white hearts. Sometimes a splash of color can really do the trick better than a mountain of color. I love how the yellow heart picks up on the color of the birds that are placed on your mantel. Beautiful. Carolina
ReplyDeleteabsolutely gorgeous xx
ReplyDeleteTif - these are so lovely! I am thinking they would too look lovely on a light shade frame!
ReplyDeleteLove you blog! Reading it from Melbourne, Australia! xo
Oh so cute and delightfully do-able!! The youngers will love these!!
ReplyDeleteBeautiful!!
ReplyDeleteJUST wonderful...I did something similar with felt hearts last year.
ReplyDeleteHUGS
Char.x
that last picture is beautiful! love it. x
ReplyDeleteso beautiful!
ReplyDeleteoh my gosh this is so, so pretty!! I love the idea of using pages from an old book, thank you for the tut!
ReplyDeleteThank you for sharing this, you have really inspired to make my own although i'm sure it won't look as pretty as yours! x
ReplyDeleteSo sweet! I love it!
ReplyDeleteyou are just amazing!!!!!!
ReplyDeletethea.
xx
(spoonful)
such a beautiful vase of flowers on your mantle piece...
ReplyDeleteBeautiful! Thanks for sharing this lovely how to.
ReplyDeleteLOVE it!
ReplyDeletemaybe it will be tomorrows project ;O)
Hi Dottie, they are pretty hung up like that I made a larger heart one in a three 3D style for my daughter for Christmas and also one for my studio. I also did a garland style one for my son using one of his old Beano comics ....circles of course, hearts would not have been allowed in his room! they are so much fun to make!
ReplyDeleteThose are just sweet as can be without actually dipping them in sugar! Now the wheels in my brain are turning and I'm thinking that I could clean up my office whilst doing this project.
ReplyDeleteI promise not to use my bills, only pretty papers.
I must make these! Thank you for sharing.
ReplyDeletethis makes me so happy and heart-FULL
ReplyDeleteTiff, these are GORGEOUS! Thank you so much for sharing your tutorial. This will be so much fun to make with my daughters for their bedrooms! Off to the shed to look for some old books. Have a wonderful day ~ Tina xx
ReplyDeleteIt’s looking very nice, thanks!
ReplyDeletethank you my dearies! i can see i am not alone with stitching hearts and paper together :)
ReplyDeleteand yes agreed squiggly rainbow, it is a similar techinque to how i did my little birdie 'hangy-me-jig' which used an old lampshade frame and it would look tres peachy :)
boxoftrixs! thank you for the extra ideas of what to use :)
and Carolina, i think you are quite right and perhaps that is why i was happy with the outcome!
Too fun! I'm going to give this a try!
ReplyDeleteVery nice dottie.
ReplyDeleteLove it, it's so pretty!
ReplyDeleteThis is a lovely, graceful, sophisticated, easy to do design, Dottie A. Thank you for sharing your creativity with us!
ReplyDeleteCheers!
So inspirational! I just re-organized my craft bins and can't wait to start some new projects. Thanks for sharing!
ReplyDeleteAdorable decorations!
ReplyDeleteThose make me so happy!
ReplyDeleteStarting on the first of feb i do a little something like that and write on a heart for my daughter and husband each day what i love about them and they hang in haileys bedroom amd davrs office.
I love valentines day, its my fav. Holiday
I send out valentines instead of christmas cards every year.
I love to love!
YaY! I was just in my craft hoarding station (a.k.a. basement) wondering what I could do with some of those old books I saved. Daughter Lydia will love the whole idea...and we'll use some scrapbook paper to liven up a bit here or there. Maybe some ric-rac or some button embellishments. Ideas are endless! Great idea!
ReplyDeletewhat a lovely post after a long cold, wet, rainy Tuesday. :)
ReplyDeleteBeautiful, just perfect for my Dottie (that's her nickname, really). She's at that funny age where she's too old for baby stuff like Barbie, but not old enough for grown-up things, so this is just perfect. I've got some narrow timber trim leftover from our bathroom renovation that'll be perfect for attaching these to. Just have to wait until they go back to school next week to haunt the op-shops again looking for a suitable old book. I might even make something similar for a friend when she has her baby in March. I think it would look lovely in a nursery in front of a window where it can catch the breeze.
ReplyDeleteOoh, these are really great! Can predict a busy old weekend for me making yards of heartiness for the nest.
ReplyDeleteSo pretty, I love it!
ReplyDeleteI think I would love to try this with snowflakes!
ReplyDeleteHeavy hearts and crafting go hand in hand for me! It really is a wonderful and economical form of therapy! And a great stress reliever too!
Thanks for the inspiration, Tiff.
Ciao Bella!
Creative Carmelina
I love these. I made a mobile for our daughter a couple of months ago using a similar method, but hadn't thought of old book paper. It's lovely. Emma. xx
ReplyDeleteTif, that's just beautiful! I want to start on a heartstring of my own, right away. I can think of so many places in my little house that could use just this kind of cheering. :)
ReplyDeleteSo so pretty, I'm off to seek out some old boooks
ReplyDeleteOh Tif, almost teared up when I read "please hold my heart". Awwwww! Really beautiful creation.
ReplyDeleteYou are one clever young lady.
Carol xx
I definitely foresee a cousin of this loveliness appearing on my office door in the not so distant future for Valentine's Day!
ReplyDelete- K
oh my, i absolutely love this idea!! thanks so much for sharing, i'm definitely going to make some of my own!
ReplyDeleteI love your blog - ok? :)
ReplyDeleteOh a happy curtain. I need to make me one of these. Thankyou!
ReplyDeleteI LOVE this idea! Thanks for sharing.
ReplyDeleteA wonderful idea. Thanks for sharing.
ReplyDeleteDaisy
xxx
These are just beautiful! x
ReplyDeletecarolinefricker.blogspot.com
oooooh lovely x
ReplyDeleteI like your Hearts, it's such a lovely Decoration !
ReplyDelete♥BunTine
Oooh, pretty! And easy :)
ReplyDeletei am so totally beaming by your kindness, truly it has been a long old day battling 'Word' on colin the computer and i stopped by to find all your lovely comments! how you have cheered my crafty soul and i am delighted to think of all those lovely heartstrings being made across the globe... thank you kindly for lighting my day dearest readers :)
ReplyDeleteLovely jubbly! I have finally managed that high hopes wraps for a chilly day. :)
ReplyDeletei adore these...and having just cleared a space above our sitting rom fireplace....i want to say a big *ta*...as now i know what to fill it with....
ReplyDeleteanother pot of tea and another creation- lovely in all this cold weather.....
thanks...
melissa xx
Oh how sweet!
ReplyDeleteI LOVE this!! Its so simple but pretty and special! Your daughter is going to love it, I'm sure! :)
ReplyDeletexo
Veronica
http://crackthesky17.blogspot.com
Just gorgeous, thanks lass :)
ReplyDeleteNo, you have cheered my crafty soul! Thank you for this beautiful DIY. I am in love. xo Samantha
ReplyDeletebeautiful! I need to get brave and get a sewing machine. Kelly
ReplyDeleteAmazing!
ReplyDeleteWhere is a book so I can start cutting hearts ASAP!
I love it! I'll do it as soon as I finish with the exams!! =DD
ReplyDeleteLove your hearts so much I made some and blogged about it...thanks for this wonderfully easy inspiration
ReplyDeletethank you! I'm making them today. A maybe when they are just a nice as your ones I will post them on my blog too, with a link ofcourse...
ReplyDeleteI love this post so much I wanted to speak French!
ReplyDeletebrilliant. i dont have a sewing machine, but i think if i run the thread between the two pieces of paper and use glue i can come up with something similar. can't wait! thanks.
ReplyDeleteHow lOVEly~ I love this, thanks so much for sharing and passing on the inspiration!
ReplyDeleteInspiration is such a great gift and you are giving to the world. Thanks! I made also a bunch of these strings and it was so much fun! See my blog: boezeroen.blogspot.com. It is in dutch, so pardon for that. But I did link you in it! And my friends are very happy with it!
ReplyDeletethanksthanksthanksthanksthanks for sharing!
Hi I found you through House on Hill road blog and i so super LOVE this! Goodness what a fun and inspiring project, thank you for sharing. I linked you on a post of mine today if you rather i didn't let me know and i will remove it. Thanks again and have a great weekend!
ReplyDeleteWhat a sweet idea....
ReplyDeleteGoing to make some :)
My daughter just sent me the link to your blog. Love the hearts. I'm imagining them as a wedding decoration, too. Lovely!
ReplyDeleteJust wanted to let you know I made one of your heartstrings today. Yes, I think I need more. :)
ReplyDeletehttp://flic.kr/p/9nuM2a
your harts are so sweet!!!! loves
ReplyDeleteThere is a link to you on my blog... Thank you very much for sharing!
ReplyDeleteKisses from Italy!
Donata
Thank you for inspiration! Just finished my dining room spring curtains.
ReplyDelete-Paula
oooh love these fabulous hearts....my great aunt always used to say 'if you can't do it with a happy heart then why bother doing it at all?' i shall therefore make a plethora of happy hearts to hang around the house :)
ReplyDeletemel! love what you great aunt used to say and my man's favourite word is plethora... yes indeed a plethora of happy hearts would be most peachy :)
ReplyDeleteLindisimo!!! Me entanto! Transmite paz, romanticismo. Te felicito! Muy dulce tu blog! Gracias!!
ReplyDeleteWhat an awesome idea! LOVE it!
ReplyDeleteThis is such a fun idea! I would love to feature this on Reduce, Reuse, Upcycle. Feel free to stop by and grab a featured button. Thanks!
ReplyDeleteHi! I pinned this on Pinterest, posted on fb, and featured at Creative DIYers Club. Please feel free to grab the feature button :)
ReplyDeleteI love this paper craft! I have cute tape too!!! Love that stuff <3
ReplyDelete